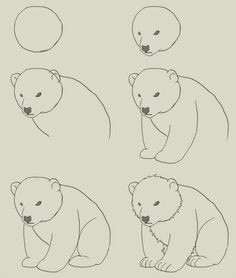
Polar bears are animals that live in one of the coldest parts of the human earth and rely on their very thick insulated furs that covers a massive fat for warmth and survival. Even the bottom of a polar bear's paws grow furs, which gives them protective warmth against all cold surfaces and helps them grip firmly on ice. Wondering how to draw a polar bear? I can show you the way to draw a polar bear cub with the entire body in a complete sitting posture!
There is no much difference between drawing a full-grown polar bear and drawing a polar bear cub-the only difference is in their sizes. One easy way to achieve this is to pay attention to simple details about the different body parts. Breaking the drawing down to simple geometrical shapes will help define the major body structure of the animal. Below is a step-by-step detail of how you can draw a polar bear cub.

Step One: Draw a circular shape
Step Two: Draw its muzzle, eyes, and nose
Step Three: Add the ears and upper body parts
Step Four: Add the two arms
Step Five: Draw the two legs in a sitting posture over the lower part of his body.
Step Six: Then add some fingers and furs over the body
Now you have a cute sitting polar bear cub! : )
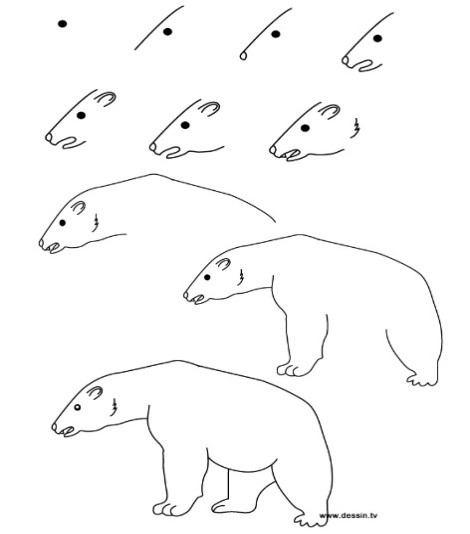
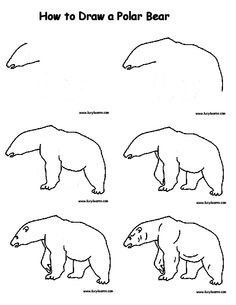
Below are also two more ways about how to draw a polar bear accurately.
First one:
Draw the two eyes first, then finish the head and entire upper body, draw the outside two legs, and lastly draw the third visible leg the other side.

Second one:
For the polar bear, draw the head first, and the shape of the body. Similar with the first one, then draw the outside visible legs and the legs on the other side finally. In the fifth step, draw the eyes and the ears. Finally, draw some fur to give it a more polar bear-like look.

You can also watch this video!
Hope you will have fun with your sister! ;)